In this session, we, as a class, went through 4 keywords (Hope, Danger, Risk, and Society) and added our thoughts and ideas that related to them.
Limits were thrown out the window for this, which resulted in chaos. Funnily enough, this was encouraged. As stated in the PowerPoint: "Even stupid ideas can lead to constructive discussion and good ideas."
02/03/2023 - Practical Identification
Based on the results of my Course Review and the pathway for my project concept, I have put into consideration what software and skills I'll practically need for the planning, production, and post-production of my game.
Here is a list of the software I've identified I need or might need in the future:
This week, we had a meeting with Barney & Elliot from Inhalation.
We discussed feedback from our PG session, like how our objects turned out and any potential ideas we got from them. We also discussed any further developments, like using PG in the future or taking a different direction entirely.
From it, I received some suggestions for further developments and project ideas for my FMP.
One potential development is PGing a hat. My game has hats as its main collectible, so a "Photogrammetric Hat" would be an amusing addition.
Another idea was to have a secret area/environment made entirely with PG. The sudden switch in style could potentially throw off unsuspecting players.
Other ideas were related to Sir Box being a kleptomaniac and how the character would cope with the urges. This made me realize that I am an idiot and that the term kleptomaniac doesn't fit the character as they have full control of their actions. One of the hats planned to be in the game is intended to be bought with money collectibles throughout the level, so this makes even less sense.
What I'm doing with the character could potentially be seen as insensitive to those who have the condition. Even if I changed the character bio, a condition like it is too serious for a game this silly/light-hearted.
Sir Box has an irrational attachment to the hats themselves but does not specifically have the urge to steal them Sure, he might steal a hat or twenty, but he will still buy a hat if required.
As a result of the meeting, I changed my character's description from kleptomaniac to marauder. It fits way better and is notably less insensitive. Kleptomaniacs can't control themselves, while my character is doing it purely for self-gain and a sense of importance.
Lastly, I started progress on my PechaKucha presentation. It is a format that involves presenting 20 slides, each lasting 20 seconds. Next week will purely be focused on PechaKucha Progress.
20/03/2023 - Week 4 (PechaKucha Progress)
This week was completely taken up by the PechaKucha.
I don't know what's going on, but I am ungodly slow in making this presentation. It needs to be good and it needs to look good. I'm slow at making the visuals and I'm even slower doing the script.
Issues with slide style consistency, not being able to write up my thoughts into a script, and slides lasting longer than 20 seconds are driving me nuts.
Thankfully, slow work is still work, so it should be done and presented by the end of next week. I will also likely create the GDD document next week too.
This week, I finished my PechaKucha and presented it. I have put the video, presentation, feedback, and reflections on my Pecha Kucha page. To keep it short: It was probably my best presentation yet. A bad Pecha Kucha, but a good presentation.
I also created and practically completed the GDD document within a couple days. I used a template, as well as referring back to my L3Y1 GDD.
I was right on schedule, if not a bit faster on the GDD, which is nice. I've done it before, so I found it quite simple to do.
As for the project timeline/schedule, it's rather quite simple. Each week, I will work on a single major aspect of the game. What I work on will be decided by a priority list. The list is rough, but it looks something like this:
Player Movement > Gameplay Elements > Level Layouts > Visuals > Sound > Cutscenes. If I fail to finish something by the end of the week, I’ll force myself to move on.
Maybe I'll work on a schedule document during the easter break?
Week 6 & 7 - Easter Break
Sadly, I didn't do anything. My confidence is low, and my energy is lower. I can't be asked to reflect for these weeks. As a result, I'll mainly focus on catch-up on the first week back, before moving on to the start of production.
19/05/2023 Edit: I have since taken a blood test and found that I am low on Vitamin D. I am now taking Vitamin D3 supplements.
17/04/2023 - Week 8 (Catch-up & Production Start)
As I took a much-needed break during Easter, I mainly did catch-up this week. I've been given feedback on areas of improvement/additions, so I've been updating the reflective logs that I missed and did Audience Consideration & Research in my Research & Experimentation.
As for production, I've started working on character movement. Specifically, I added double-jumping. You press the jump button again while in the air, and you jump again. A simple, yet effective common addition to platformer games.
Simple, right? I wish. To avoid me ripping my hair out, I'm using Unity's own 'Starter Assets - Third Person Character Controller' asset as it is designed to be a quick start to prototyping.
Reading the pre-made scripts for the first time felt like alien scripture to me. I had to somehow implement double-jumping within a script that I don't fully understand, and so what should've been a 5-15 minute job instead took 2 hours. I suck.
On the bright side, it works. Hopefully, the other movement options should be much easier to code in when I work on it next week.
Next, I need an area to test the movement in, but thankfully I don't need to actually do anything.
Remember that Practical Experimentation I did? I am going to take that Unity project and use it as the basis for my FMP Project. Later, I'll replace all the textures and trees with ones more fitting, but doing this will save me a lot of time in the future.
This week was a rough start, but hopefully, the next few weeks won't be this bad. Clearly, I need to develop my coding skills further before I can start casually reading and understanding code in scripts as involved as that character controller script.
Next week is when I will follow the schedule I've written in my GDD, starting with Player Movement.
24/04/2023 - Week 9 (Production - Movement & Feedback / Starting on Gameplay Elements)
This week, I mainly focused on coding in additional movement options. Namely, Air-Dashing, Short-Jumping, and Hat-Tastic Mode. Afterward, I started adding Gameplay Elements.
First, the airdash. It uses the CharacterController.Move function to do exactly what it says. If the player is not grounded, presses left-shift, and hasn't airdashed yet, it sets canAirDash to false so you can't air-dash multiple times in a single jump and then runs two coroutines: The first one (Dash) moves the player up and forward, creating the dash effect. The other (DashSlowdown) lowers the dash speed every 0.15 seconds, slowing the dash down over time.
As for why I wanted to implement an airdash in the first place, it's mainly because both Super Mario Odyssey and A Hat in Time also had one. Plentiful movement options help with the general feel of a platformer, so it's a no-brainer that mine should have an air dash too.
Next, I allowed the player to control the height of their jump to allow different jump heights. This is done by checking if the player has released the jump button and reducing the vertical velocity as a result.
Yes, this is all I needed to do. The code relating to vertical velocity is already present within the starter asset controller, so all I needed to do is divide the velocity when the jump button is no longer held. Thanks, Unity.
Again, giving the player extra control in their movement really adds to a game, and jump height control was a thing even in SMB1. It would be criminal not to include it.
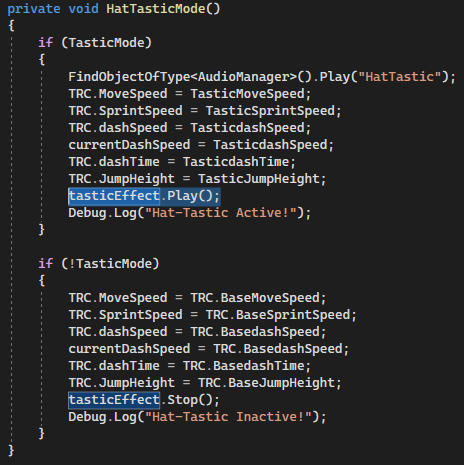
Finally was the 'Hat-Tastic Mode'. A risky, yet very fast mode that more experienced players can abuse to utterly break the game. Simply put: Movement speed, jump height, and dash speed are drastically increased.
This mode is loosely inspired by Pizza Tower's fast-paced gameplay, the Super Sonic transformation in most Sonic the Hedgehog games, and the speedrunning community as a whole. I just like seeing people go fast, and I wanted to replicate Super Sonic's ability to utterly break the game by including a high-risk mode that does something akin to it.
Coding this in was, surprisingly, really simple.
There are three sets of movement float in play: Current, Base, 'Tastic'.
When triggering the Hat-Tastic Toggle (by pressing Q and E at the same time), all 'Current' floats are changed to match 'Tastic's floats. When the mode is toggled off, all 'Current' floats are changed to match the 'Base' floats.
With the movement receiving a significant upgrade, my next task is to get people to play-test it and give me feedback.
The first person is a big fan of A Hat in Time, one of the games I'm taking inspiration from for this project, and they gave me quite a lot of positive feedback:
The movement is flexible and opens up more opportunities
The double jump and air dash give a lot of control, especially as you can turn mid-air.
The 'Hat-Tastic Mode' is difficult to control and is very satisfying as a result. They said they wished other games included a "Go-Fast Button". They said to keep the insane speed as-is.
It's good to know that I seem to be on the right track. However, as I am keeping accessibility into consideration, I need feedback from someone that might run into some difficulty with the controls.
The second person is a non-PC gamer and as the game can't be tested with controllers yet, they gave me some excellent feedback:
The controls were somewhat easy to get used to, despite being a gamer that prefers controllers over mouse+keyboard.
The character moves around and performs actions adequately and smoothly.
It would be easier for them if the controls were Arrow-Keys + Mouse instead of Keyboard+Mouse.
Honestly, I forgot to consider the possibility of someone not being used to WASD controls.
As a result of this, I've made it so that Left-Click can be used to jump, Right-Click can be used to dash in the air, and the Left & Right Arrow Keys can be used to trigger Hat-Tastic Mode.
The third person gave me some interesting and potentially conflicting feedback:
The movement is very responsive and sharp
The addition of dashing is a positive.
"Hat-Tastic Mode"'s addition is a positive, albeit very gimmicky.
"Hat-Tastic Mode" is hard to control and the speed should be toned down.
Now, this is where a problem arises. One person said to keep the mode's speed exactly the same, while another person suggested reducing it. Who do I listen to? Do I cater to both and reduce the speed very, very slightly? Honestly, I don't know.
The fourth and final person gave me short, albeit very important accessibility feedback:
The camera sensitivity felt a bit too low and could benefit from having the option to adjust it.
Highlighted in yellow in the bottom right is the addition to the script. It is a new public Vector2 variable that I can adjust to increase or decrease the camera's speed/sensitivity. As it is a public variable, I can potentially make a "Camera Sensitivity" option in a settings menu to allow people to adjust it to their liking.
The last thing I did this week was start work on the gameplay elements.
First up are the money mini-collectibles.
The model for it I fully winged--doing the first thing that came to my head.
In Blender, you can add a text object and extrude it to give depth. From there, it can be converted into a mesh. I wanted the mini-collectible would be a simple floating $.
However, that's boring, so I randomly thought "Hey, what if it had a face?"
Next, I got it to rotate in-game. This is easily achieved by adding a Rigidbody component to an object, reducing its angular drag to 0, and calling the Rigidbody.AddTorque function on Start() in a script.
As the object has zero drag, the object will never slow down and stop spinning. This is way less intensive than doing a constant rotation in Update(), as I'll likely have 10-25 of these objects, and each of them calling a function every frame would end very badly.
Now, why did I add floating dollars as a collectible? Well, it's meant to be a reference to and/or reminiscent of the collectibles in N64 platformers developed by Rare, specifically Banjo-Kazooie's Musical Notes and Conker's Bad Fur Day's Cash.
In Banjo-Kazooie, one of the main collectibles is Musical Notes. There are 100 of them in each level and the majority must be collected to progress further in the game to unlock Note Doors. They just float around and are nothing special.
In Conker's Bad Fur Day, they have a similar function in which they are a main collectible and are required to access other areas but are not as plentiful as the notes. Unlike the Notes, they are living--they can talk and swear at you.
My dollar collectible is essentially a combination of these two, being a floating mass-placed money collectible with eyes.
A lot was done this week, and I'm still on schedule too. The additional player movement felt much easier to code in than the double jump was, and learning how to efficiently make objects spin was oddly satisfying.
If I can keep up the loop of "I don't know how to do this" and then searching up a guide/solution in a timely manner, then I should be able to stay on schedule for the whole of production.
As per my schedule, I will continue with Gameplay Elements next week.
02/05/2023 - Week 9 (Production - Gameplay Elements Continued)
This week, I continued progress on the gameplay elements. Specifically, I added in two hats and code for the player health and enemy logic. I also added some basic UI elements, just in case I run out of time later.
First, I had to choose which hats to actually make. Factors include: how easy it is to model, how recognizable it is, and if it is fundamentally amusing. From this, I chose to model a Beanie and Party Hat first. Modeling the two was quite easy, as they can be made from simple shapes.
I have concerns about the Party Hat though, as it has a whopping 8 materials: 1 for each color of the rainbow and an extra for the bulb.
The player health and enemy logic didn't require much effort, as it wasn't fully made by me.
Earlier in the year, we created a few unity projects to learn the program. One of them was a shooter game, and it included code for player health and NavMesh-based enemy movement. So, I went back into the shooter project and took the scripts from it to be re-used in my project. Work smart, not hard. (That being said, it had to be heavily edited to fit my own needs and game).
As for killing the enemy, I went with a super-lazy Mario-style "Jump on them and they die" method.
There is a separate GameObject parented to the enemy, which has its own collider located on its head.
Jump on it, and an event triggers that disables the enemy. Woohoo, I'm lazy.
Now that I have player health implemented, I can update the HatTastic mode to add a co-routine that drains hp if they are above 1 hp.
Finally, I added placeholder-but-probably-will-be-final UI to keep track of all the values.
I also started on making a Fez, but that'll have to wait for later.
Monday was a bank holiday, and Monday so happens to be our 2nd longest day, behind Thursday. This results in a lot less work being done, as Thursday is my best chance at focusing on the project.
Next week is Level Layouts, as stated in my schedule.
Before I started on the level building this week, I quickly finished the fez hat that I started at the end of last week.
However, the tassel was unbelievably difficult to create. The method I chose was to create hair particles and convert them into a mesh. It did technically work, but the poly-count was way too high.
As of writing this, I don't even fully remember what I did to patch it up. What a mess.
After that slightly off-schedule mess, I started on level-building.
First was the hat shop. It's quite simple and even has a red hexagonal shopkeeper too.
Other than the fact the money collectables need a purpose, there are a few other reasons I added a hat store to the game.
First, it's amusing that a hat-loving narcissistic marauder who is feared by the public still abides to the rules of trade. If you're wondering "Why doesn't he just steal it?", I'll spoil it for you: That's the joke.
Secondly, it could be perceived as a reference to Team Fortress 2, a 2007 multiplayer first-person shooter that is known for its hats. In fact, the whole game's premise could be seen as one big nod to that game, as Sir Box's love for hats parallels that of TF2 Players.
The standard assets come with prototype prefabs to build with, so what we did during that project was build the environment to move around in. I designed mine to have numerous walls to peek behind and elevated places to gain a height advantage.
Conveniently, the elevated objects are a perfect fit for use in my platformer, so no major changes have to be made. I love reusing assets.
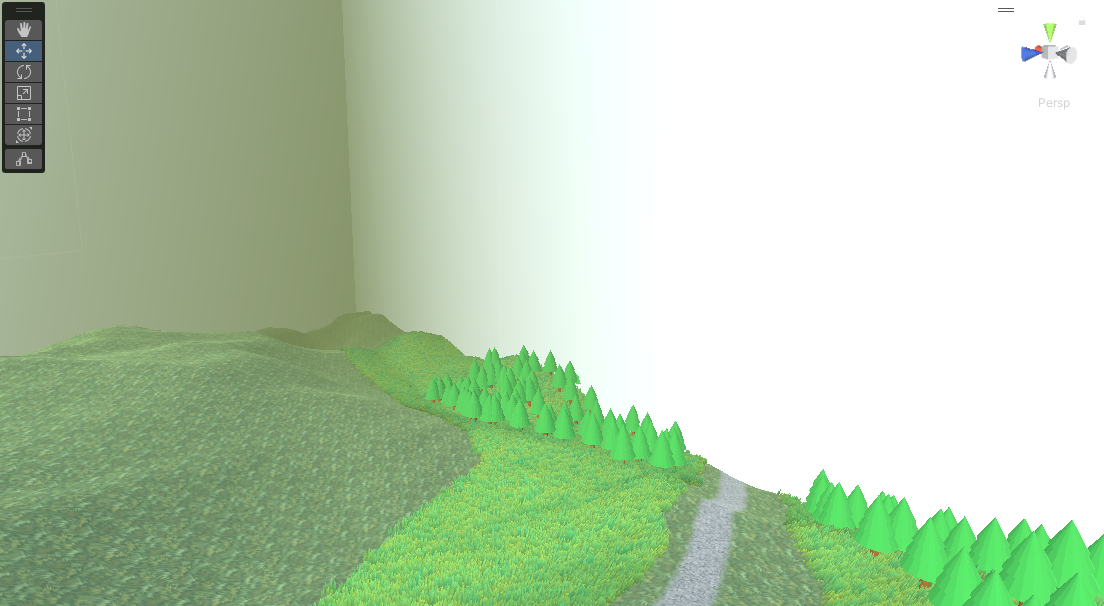
Next, I created an obstacle course on the mountain. Now, before you ask why I put an obstacle course on the mountain: Ever heard of a game called 'Roblox'? From the red kill bars to the square respawn platform, this course is meant to replicate the old "Obby" games on the platform. When I say old, I mean old.
For it, I made a new short script where if the player touches any of the red bars, they are teleported to the purple platform at the start of the course.
Finally, now would be a good time to implement invisible walls. They're made visible here for convenience. These walls will stop people from walking off the boundaries of the map and falling into the endless void.
There is nothing special about these, they are literally just really big walls. Do I even need to elaborate on these?
Next week, I'll implement Visuals and Sound. They shouldn't take too long individually, so they should take only a single week to add both.
15/05/2023 - Week 11 (Production - Visuals, Sound, and Tutorial)
This week, I worked on the visuals, sound, and starting tutorial zone for the game. The project is now finally in a finished, presentable state.
The visuals will have to wait though as I am going off-schedule again, albeit for around only an hour max. I very quickly modelled an enemy base in Blender and applied the same material the enemies use to it. I flattened the terrain in a corner to put it in, but that meant I had to re-generate the navmesh.
This is when I ran into a major problem--the navmesh wouldn't generate. After searching, I found that it was likely taking forever to do, but I had no idea why.
As it turns out, the trees that I added to the terrain are included in the calculation. As there are a lot of trees in the scene, it would've taken forever. Annoyingly, the only choice I had was a workaround that involved deleting the trees, generating the navmesh, and then undoing the tree deletion.
Obviously, I added effects because they visually add to the game, but the reason I chose this specific pack and all the future ones I implement was because of its choice of style: Cartoon. My game is meant to be cartoonish in style, so these fit rather nicely into my game. As for why I chose certain effects, I just picked what felt right to me.
Implementing them into the game was a bit tricky, as each object required its own setup. The hats didn't need any changes as disabling the parent also disables its children, including the particle effect.
The Hat-Tastic mode was also simple, I just needed to specify when it plays and stops.
The enemy death and money-pickup effects, however, required some extra work. As they are meant to play after an object is disabled, I can't just make it a child (as it would obviously end up disabled prematurely). Instead, I need to make use of prefabs.
If I make an empty GameObject and put the effect in it as a child, I can then make it a prefab and Instantiate said prefab within the enemy death script. I can then tell it to create the prefab at the game object (in this case, the enemy that dies), which then auto-plays the death effect.
One small issue with this, however: The object won't delete itself. After a while, you'd have upwards of 10 GameObjects still loaded and doing nothing, which is not ideal. The answer is simple: Destroy it.
This script has 1 job: 1.5 seconds after the object is created, destroy the object. This is perfect, as the object only exists when it's instantiated and the death and pickup effects only last around a second.
Now you may have noticed in previous images that some objects actually have an outline. It was actually one of the first things I implemented but wanted to wait until now to go over it. I am using the "Quick Outline" asset pack by Chris Nolet. It is a simple tool/script that adds a solid outline to any object. As my game is cartoonish in style, a cartoon outline effect is a no-brainer addition to my project.
The Unity Asset Store is overpowered.
However, this caused some issues with the cartoon particle effects as the outline script affects all children of an object--including the particles. This caused the particles to become solid black bars. It resulted in me spending 30 minutes trying to figure out why every particle effect was breaking, and I ended up having to restructure the hierarchy of almost every game object.
With this script, I can create a list of audio that can individually be edited to change its volume, pitch, and if it loops or not. Then, I can add the line "FindObjectOfType<AudioManager>().Play("Name");" and replace "Name" with any sound I specified in the list above to any of the scripts I've previously made/edited.
With the sound being quicker than I expected to implement, I have a bit of extra time. My game currently lacks a tutorial, so that's exactly what I added next: an entirely separate starting scene.
The plan was to have a cutscene of Sir Box leaving his house, which leads into a tutorial level.
However, I don't have time to make cutscenes now, so this will do.
To the left is the optional tutorial zone. If you don't need the tutorial, then simply run past it and skip it.
It's also integrated into the game itself so it doesn't disrupt the flow of game-play.
I really shouldn't need to explain why a tutorial is important or why I added one. How are you meant to know how to control the game if you aren't told?
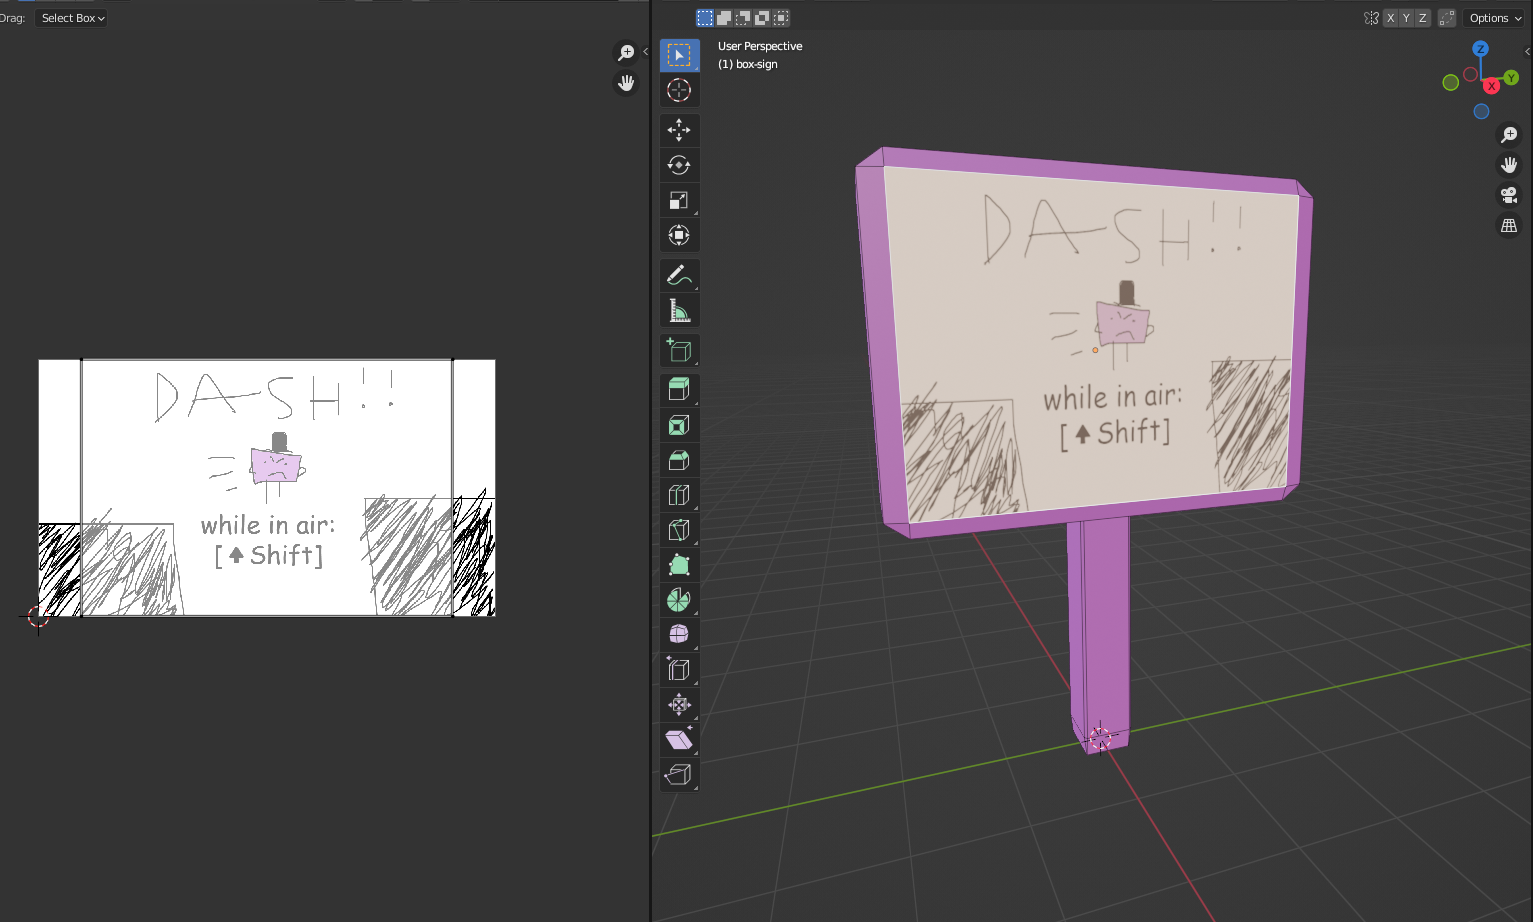
However, the true highlights are the signs placed around the scene.
---
---
Clearly, I am the best artist to ever exist. The art is exquisite. (Yes, these were made in MS Paint).
I thought it would be funny to have the tutorials look like complete garbage. It almost feels like they were created in-universe by Sir Box.
The sign is just two bevelled and scaled cubes. I also UV-mapped the front so I can actually display the super good art correctly.
Right before the production cut-off deadline, I snuck in one final thing: A reference to my 1st-year FMP.
The game's twist was that it's actually a prequel to my previous FMP, Project HMYPAVGABY. However, I ran out of time to make the ending. The addition of the Easter Egg at least hints towards the two games taking place in the same universe.
With the starting tutorial zone added, the project is finally in a finished state. I met all the non-bonus deadlines too. I may make some extra changes if it is required, but otherwise, it's finished.
It's a shame I didn't have the time to do any animated cut-scenes, but it isn't the end of the world as those were low-priority and were only going to be implemented if I had a lot of extra time anyway.
I'll also go back and finish any reflective writing I skipped or half-finished, as it is easily the hardest part of the course.
While I didn't end up doing everything I planned out, I'm still happy with the end result.
All guides I used/followed are located on my Bibliography page.
.png)


No comments:
Post a Comment